1. 前言
本文是 Spring in Action, 4/e 的读书笔记,涵盖Spring 4.x新增的内容,并结合Spring的文档与源码做了一些注解。 因为是篇实战性文章,将不对Spring中具体技术的实现/原理作太多描述。
“ 快速上手 ”之意是适合有经验的Spring开发人员作快速参考之用。
初学者不建议阅读。
2. Spring Core
2.1. Bean的装配
2.1.1. 装配方式
Spring 提供了三种主要的Bean装配方式:
-
显示地在XML中配置
-
显示地在Java中配置
-
隐式地通过Bean的自动装配机制配置
三种方式的使用依个人喜好,但应尽可能使用自动化配置,减少显示的配置方式的使用。如果必须使用显示配置 的情况(比如要配置的Bean的源码并非由你维护),使用 类型安全(type-safe)、重构方便的 JavaConfig 要好于XML。 当然,在XML方式提供了非常方便的标签(或namespace)而JavaConfig中却没有等价实现的情况,可以使用XML。
2.1.2. Bean的自动装配
Spring对Bean的自动装配主要通过 “Component Scanning” 和 “Autowiring” 来完成,其实分别指 @ComponentScan 和 @Autowired 注解。
给类加上 @Component 注解就可以创建一个能被组件扫描机制(Component Scanning)发现的Bean:
package org.calvin.springfast;
import org.springframework.stereotype.Component;

@Component                                                           (1)
public class SgtPeppers implements CompactDisc {
  private String title = "Sgt. Pepper's Lonely Hearts Club Band";
  private String artist = "The Beatles";

  public void play() {
    System.out.println("Playing " + title + " by " + artist);
  }
}| 1 | 这种情况下该bean的ID就是首字母小写的类名,也可以通过使用 @Component("sgtPeppers") 显示赋一个ID |
不过组件扫描默认是不开启的,需要在Spring中配置一下:
package org.calvin.springfast;
import org.springframework.context.annotation.ComponentScan;
import org.springframework.context.annotation.Configuration;

@Configuration
@ComponentScan                                                       (1)
public class CDPlayerConfig {
}| 1 | @ComponentScan 用于配置Spring的组件扫描功能 |
如上不加额外配置的情况,@ComponentScan 默认只扫描当前配置类所在package及其子package下加了 @Component 注解的类。
等价的XML配置方式:
<?xml version="1.0" encoding="UTF-8"?>
<beans xmlns="http://www.springframework.org/schema/beans"
  xmlns:xsi="http://www.w3.org/2001/XMLSchema-instance"
  xmlns:context="http://www.springframework.org/schema/context"
  xsi:schemaLocation="http://www.springframework.org/schema/beans
    http://www.springframework.org/schema/beans/spring-beans.xsd
    http://www.springframework.org/schema/context
    http://www.springframework.org/schema/context/spring-context.xsd">

  <context:component-scan base-package="org.calvin.springfast" />
</beans>
如果需要扫描其他的package,可以如下配置:
// 直接使用ComponentScan的value属性
@Configuration
@ComponentScan("org.calvin.springfast.other")
public class CDPlayerConfig { }

// 或者显示地配置basePackages
@Configuration
@ComponentScan(basePackages="org.calvin.springfast.other")
public class CDPlayerConfig { }

// 对于需要配置多个package的情况
@Configuration
@ComponentScan(basePackages={"org.calvin.springfast.one", "org.calvin.springfast.two"})
public class CDPlayerConfig { }

// 或者使用更加类型安全的方式配置
@Configuration
@ComponentScan(basePackageClasses={CDPlayer.class, DVDPlayer.class})
public class CDPlayerConfig { }
对于Bean中依赖的其他Bean,可以使用 @Autowired 装配,@Autowired可以加到构造函数、Setter方法或类变量之上,
如果没有找到匹配的Bean,Spring 会抛出异常,当然可以通过 @Autowired(required=false) 来避免,
但这么做@Autowired注解的依赖可能为null,需要注意检查:
@Autowired(required=false)
public CDPlayer(CompactDisc cd) {
  this.cd = cd;
}
2.1.3. 在Java中配置Bean
自动配置虽然很方便,不过在有些场景下,比如说要装配一个来自第三方库的组件,显然不可能或不适合在其源码上加上@Component和@Autowired, 这种情况适合使用显示地配置方式。
JavaConfig 的方式因为类型安全、重构友好、更加强大,相对XML是更好的选择。注意不要在JavaConfig的配置代码中掺入业务逻辑相关的代码。
使用 @Configuration 注解就可以创建一个JavaConfig的配置类,正如之前示例代码中那样,而要在JavaConfig配置类中创建Bean可以如下:
@Bean                                                                (1)
public CompactDisc sgtPeppers() {                                    (2)
  return new SgtPeppers();
}| 1 | @Bean 注解告诉Spring该方法所返回的对象应该在Spring 的ApplicationContext中注册为Bean。 |
| 2 | 该Bean的ID默认为该方法的名称,也可以使用 @Bean(name="yourBeanName") 为Bean显示设置ID。 |
在JavaConfig方式下注入依赖直接调用创建Bean的方法即可:
@Bean
public CDPlayer cdPlayer() {
  return new CDPlayer(sgtPeppers());                                 (1)
}

@Bean
public CDPlayer anotherCDPlayer() {
  return new CDPlayer(sgtPeppers());
}| 1 | 因为sgtPeppers方法添加了 @Bean 注解,所有对该方法的调用都被Spring拦截并确保返回同一个Bean对象。 |
除了使用方法注入,还可以使用参数的方式:
@Bean
public CDPlayer cdPlayer(CompactDisc compactDisc) {                  (1)
  return new CDPlayer(compactDisc);
}
// ..或者
@Bean
public CDPlayer cdPlayer(CompactDisc compactDisc) {
  CDPlayer cdPlayer = new CDPlayer(compactDisc);
  cdPlayer.setCompactDisc(compactDisc);
  return cdPlayer;
}| 1 | CompactDisc会被Spring自动注入为之前声明的Bean |
2.1.4. 在XML中配置Bean
XML 已经不是首选的配置方式,不过在某些特殊场景下(比如遗留代码等)还是会用到。
在XML中配置一个Bean,可以如下:
<?xml version="1.0" encoding="UTF-8"?>
<beans xmlns="http://www.springframework.org/schema/beans"
  xmlns:xsi="http://www.w3.org/2001/XMLSchema-instance"
  xsi:schemaLocation="http://www.springframework.org/schema/beans
    http://www.springframework.org/schema/beans/spring-beans.xsd
    http://www.springframework.org/schema/context">
  <!-- configuration details go here -->

  <!--
    BlankDisc 的构造函数为 :
       public BlankDisc(String title, String artist, List<String> tracks) { }
     -->
  <bean class="org.calvin.springfast.BlankDisc">                     (1)
    <constructor-arg value="Sgt. Pepper's Lonely Hearts Club Band" />
    <constructor-arg ref="compactDisc" />
    <constructor-arg>
      <list>
      <value>Sgt. Pepper's Lonely Hearts Club Band</value>
      <value>With a Little Help from My Friends</value>
      <ref bean="sgtPeppers" />
      <!-- ...other tracks omitted for brevity... -->
      </list>
    </constructor-arg>
    <property name="compactDisc" ref="compactDisc" />
    <property name="artist" value="The Beatles" />
    <property name="tracks">
      <set>
        <value>Getting Better</value>
        <value>Fixing a Hole</value>
        <!-- ...other tracks omitted for brevity... -->
      </set>
    </property>
  </bean>
</beans>| 1 | 该bean没有显示设置ID,所以其ID由Spring设置为 org.calvin.springfast.SgtPeppers#0 。 |
这一个示例展示了如何配置一个Bean及其相关的依赖,包括构造函数和属性的注入。
2.1.5. 混合方式配置
XML和JavaConfig各有各的适用场景,也可能会存在两种方式同时使用的情况,这样要么在JavaConfig的配置类中引入XML配置文件, 要么在XML配置文件中引入JavaConfig的配置类,无论哪种方式,其实都是将配置好的Bean在Spring容器中注册。
JavaConfig中通过 @Import 和 @ImportResource 注解来分别引入其他的配置类和配置文件。
例如存在:
@Configuration
public class CDConfig {
  @Bean
  public CompactDisc compactDisc() {
    return new SgtPeppers();
  }
}
那么可以在另外一个配置类中这样引入:
@Configuration
@Import(CDConfig.class)
public class CDPlayerConfig {
  @Bean
  public CDPlayer cdPlayer(CompactDisc compactDisc) {                (1)
    return new CDPlayer(compactDisc);
  }
}| 1 | 因为已经使用@Import引入CDConfig配置类,所以这里的compactDisc将注入Bean,不会为空。 |
多个配置类的情况:
@Configuration
@Import({CDPlayerConfig.class, CDConfig.class})
public class SoundSystemConfig {
}
需要引入XML配置文件的情况:
@Configuration
@Import(CDPlayerConfig.class)
@ImportResource("classpath:cd-config.xml")                           (1)
public class SoundSystemConfig {
}| 1 | 引入cd-config.xml后,其中定义的Bean可以注入到CDPlayerConfig中 |
我们知道在XML中引入其他XML配置文件使用如 <import resource="cd-config.xml" /> ,
而如果要在XML中引入JavaConfig的配置类,只需在XML中将该配置类配置为Bean标签:
<?xml version="1.0" encoding="UTF-8"?>
<beans xmlns="http://www.springframework.org/schema/beans"
  xmlns:xsi="http://www.w3.org/2001/XMLSchema-instance"
  xmlns:c="http://www.springframework.org/schema/c"
  xsi:schemaLocation="http://www.springframework.org/schema/beans
    http://www.springframework.org/schema/beans/spring-beans.xsd">

  <bean class="org.calvin.springfast.CDConfig" />                    (1)
  <import resource="cdplayer-config.xml" />                          (2)
</beans>| 1 | 引入JavaConfig配置类 |
| 2 | 引入另外一个XML配置文件 |
2.2. 高级用法
2.2.1. 环境相关的配置
Spring支持配置与环境相关的Bean,也就是在某些环境下这些Bean可用,而在其他环境下不可用, 比如与数据源相关的Bean,开发环境和生产环境所使用的完全不同的情况。
在Java配置方式下使用的是 @Profile 注解,该注解在Spring 3.1 只能放在类上,3.2之后可以跟 @Bean
注解一起放到方法上:
// @Profile 加到配置类上,则在该配置类中配置的所有的Bean,只在profile激活时才创建
@Configuration
@Profile("prod")
public class ProductionProfileConfig {
  @Bean
  public DataSource dataSource() {
    JndiObjectFactoryBean jndiObjectFactoryBean = new JndiObjectFactoryBean();
    jndiObjectFactoryBean.setJndiName("jdbc/myDS");
    jndiObjectFactoryBean.setResourceRef(true);
    jndiObjectFactoryBean.setProxyInterface(javax.sql.DataSource.class);
    return (DataSource) jndiObjectFactoryBean.getObject();
  }
}

// @Profile 配合 @Bean 加到方法上,相关方法生成的Bean只在其所属Profile激活时加载
@Configuration
public class DataSourceConfig {

  @Bean(destroyMethod="shutdown")
  @Profile("dev")
  public DataSource embeddedDataSource() {
    return new EmbeddedDatabaseBuilder()
      .setType(EmbeddedDatabaseType.H2)
      .addScript("classpath:schema.sql")
      .addScript("classpath:test-data.sql")
      .build();
  }

  @Bean
  @Profile("prod")
  public DataSource jndiDataSource() {
    JndiObjectFactoryBean jndiObjectFactoryBean = new JndiObjectFactoryBean();
    jndiObjectFactoryBean.setJndiName("jdbc/myDS");
    jndiObjectFactoryBean.setResourceRef(true);
    jndiObjectFactoryBean.setProxyInterface(javax.sql.DataSource.class);
    return (DataSource) jndiObjectFactoryBean.getObject();
  }
}
在XML中配置只需要使用 <beans profile="dev">..</beans> 将相关代码包括起来:
<?xml version="1.0" encoding="UTF-8"?>
<beans xmlns="http://www.springframework.org/schema/beans"
  xmlns:xsi="http://www.w3.org/2001/XMLSchema-instance"
  xmlns:jdbc="http://www.springframework.org/schema/jdbc"
  xmlns:jee="http://www.springframework.org/schema/jee"
  xmlns:p="http://www.springframework.org/schema/p"
  xsi:schemaLocation="
    http://www.springframework.org/schema/jee
    http://www.springframework.org/schema/jee/spring-jee.xsd
    http://www.springframework.org/schema/jdbc
    http://www.springframework.org/schema/jdbc/spring-jdbc.xsd
    http://www.springframework.org/schema/beans
    http://www.springframework.org/schema/beans/spring-beans.xsd">

  <beans profile="dev">
    <jdbc:embedded-database id="dataSource">
    <jdbc:script location="classpath:schema.sql" />
    <jdbc:script location="classpath:test-data.sql" />
    </jdbc:embedded-database>
  </beans>

  <beans profile="qa">
    <bean id="dataSource"
      class="org.apache.commons.dbcp.BasicDataSource" destroy-method="close"
      p:url="jdbc:h2:tcp://dbserver/~/test"
      p:driverClassName="org.h2.Driver"
      p:username="sa"    p:password="password"
      p:initialSize="20" p:maxActive="30" />
  </beans>

  <beans profile="prod">
    <jee:jndi-lookup id="dataSource" jndi-name="jdbc/myDatabase"
      resource-ref="true" proxy-interface="javax.sql.DataSource" />
  </beans>

</beans>
Spring通过两个属性 spring.profiles.active 和 spring.profiles.default 来决定应该激活的profile,
spring.profiles.active 的值优先于 spring.profiles.default ,如果两者都没有赋值,则不激活任何profile,
也就是只有非profile中的Bean才会被创建。
-
作为 DispatcherServlet 的初始化参数
-
作为web应用的上下文参数
-
作为JNDI记录
-
作为环境变量
-
作为JVM的系统属性
比如在 web.xml 中:
<?xml version="1.0" encoding="UTF-8"?>
<web-app version="2.5" >
...
<context-param>
  <param-name>spring.profiles.default</param-name>                   (1)
  <param-value>dev</param-value>
</context-param>

<servlet>
  <servlet-name>appServlet</servlet-name>
  <servlet-class>
    org.springframework.web.servlet.DispatcherServlet
  </servlet-class>
  <init-param>
    <param-name>spring.profiles.default</param-name>                 (2)
    <param-value>dev</param-value>
  </init-param>
  <load-on-startup>1</load-on-startup>
</servlet>
...| 1 | 作为web应用的上下文参数 |
| 2 | 作为DispatcherServlet的初始化参数 |
2.2.2. 有条件约束的bean
Spring 4 新增的 @Conditional 注解可用来添加到@Bean注解的方法上,并在特定条件满足时才创建该Bean。
@Conditional注解只接受实现了Conditional接口的类:
public interface Condition {
  boolean matches(ConditionContext ctxt,  AnnotatedTypeMetadata metadata);
}
// ... 只有在属性magic不为空时满足条件
public class MagicExistsCondition implements Condition {
  public boolean matches( ConditionContext context, AnnotatedTypeMetadata metadata) {
    Environment env = context.getEnvironment();
    return env.containsProperty("magic");
  }
}
//..
@Bean
@Conditional(MagicExistsCondition.class)                             (1)
public MagicBean magicBean() {
  return new MagicBean();
}| 1 | MagicBean只有在属性magic不为空时才会创建 |
2.2.3. 解决Bean自动装配时的歧义性
我们知道Bean的自动装配是根据类型匹配的,如果是一个接口就可能就会存在多个实现类的情况,
这种情况下Bean的自动装配会失效并抛出异常 NoUniqueBeanDefinitionException 。
如果使用 @Autowired 会匹配到多个Bean,可以使用 @Primary 注解来消除歧义。@Primary注解的Bean总是被优先匹配。
// 加入存在如下需要自动装配实现了Dessert接口的Bean
@Autowired
public void setDessert(Dessert dessert) {
  this.dessert = dessert;
}

// @Primary 可以跟 @Component 一起使用
@Component
@Primary
public class IceCream implements Dessert { ... }

// 当然也可以跟 @Bean 方法一起
@Bean
@Primary
public Dessert iceCream() {
  return new IceCream();
}
如果使用XML:
<bean id="iceCream" class="com.desserteater.IceCream" primary="true" />@Primary的问题是如果存在多个添加了该注解的Bean,那么在匹配时还是会存在歧义性。
可以使用 @Qualifier 配合 @Autowired 可以自动装配一个唯一的Bean,
@Qualifier 注解的参数为Bean的唯一限定符,通常也就是Bean的ID或者是标注在Bean上的@Qualifier的参数。
@Autowired
@Qualifier("cold")
public void setDessert(Dessert dessert) {
  this.dessert = dessert;
}

// 以下为可能匹配到的情况

@Bean
public Dessert cold() { ... }

@Bean
@Qualifier("cold")
public Dessert iceCream() { ... }

@Component
@Qualifier("cold")
public class IceCream implements Dessert { ... }
除了@Qualifier和@Autowired的组合,还可以直接使用 @Resource(name="beanId") 。
2.2.4. Bean的生命周期
默认情况下Spring创建的Bean是单例模式,在整个应用生命周期中不管被使用、被注入多少次,始终是同一个实例。 Spring也支持其他生命周期范围的Bean:
-
Singleton ,整个应用中只有一个实例
-
Prototype ,每次在被注入或者从Spring应用上下文(application context)中获取时使用新创建的实例
-
Session ,在Web应用中使用,在每个会话范围内只有唯一的实例
-
Request ,在Web应用中使用,在每个请求范围内只有唯一的实例
可以使用 @Scope 注解配合 @Component 和 @Bean 来配置Bean的生命周期:
@Component
@Scope(ConfigurableBeanFactory.SCOPE_PROTOTYPE)                      (1)
public class Notepad { ... }
// 或者
@Bean
@Scope(ConfigurableBeanFactory.SCOPE_PROTOTYPE)
public Notepad notepad() {
  return new Notepad();
}| 1 | 也可以使用 @Scope("prototype") ,使用SCOPE_PROTOTYPE常量可以减少可能的拼写错误 |
在XML中:
<bean id="notepad" class="com.myapp.Notepad" scope="prototype" />在Web应用中对于需要在请求或会话中保存状态的Bean来说,全局的单例模式不适用,比如说一个购物车Bean, 一个生命周期为会话范围的Bean会更合适。
@Component
@Scope(
  value=WebApplicationContext.SCOPE_SESSION,                         (1)
  proxyMode=ScopedProxyMode.INTERFACES)
public ShoppingCart cart() { ... }| 1 | 常量 SCOPE_SESSION 是从 WebApplicationContext 中获取的 |
这样Spring对于每个会话都会创建一个ShoppingCart的实例, 注意 @Scope 的 proxyMode 属性, 将一个会话范围的Bean注入到另一个单例模式的Bean中时,注入到单例Bean中的其实是Spring生成的一个代理, 该代理暴露会话范围Bean一样的方法,只是将具体的请求转发给实际的会话Bean实例。
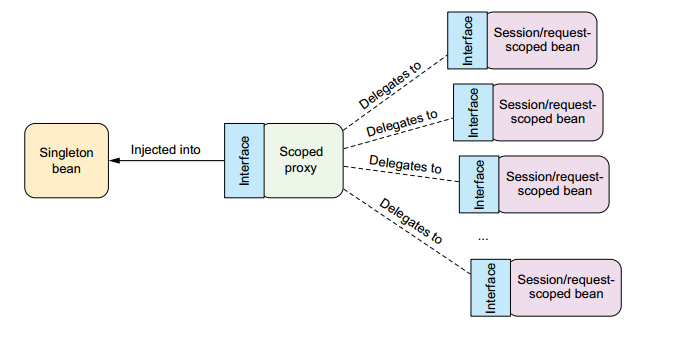
如上代码中如果ShoppingCart是接口那么proxyMode应为 ScopedProxyMode.INTERFACES ,
如果是具体的类则必须为 ScopedProxyMode.TARGET_CLASS (这种情况下代理类是通过 CGLIB 生成的)。
在XML下等效的配置为:
<bean id="cart" class="com.myapp.ShoppingCart" scope="session">
  <aop:scoped-proxy />                                               (1)
  <!-- <aop:scoped-proxy proxy-target-class="false" />  -->          (2)
</bean>| 1 | 等效于@Scope中的proxyMode属性,默认是采用CGLIB生成基于目标类的代理 |
| 2 | 把 proxy-target-class 设为false则采用基于接口生成的代理 |
2.2.5. 运行时注入value
对在运行时值的注入,Spring提供了两种方式:
-
属性(Property)占位符
-
SpEL 表达式
对于属性文件,最简单的使用方式就是先加载,然后再从 Environment 中获取其中属性的值:
@Configuration
@PropertySource("classpath:/com/soundsystem/app.properties")         (1)
public class ExpressiveConfig {

  @Autowired
  Environment env;

  @Bean
  public BlankDisc disc() {
    return new BlankDisc(
      env.getProperty("disc.title"), env.getProperty("disc.artist"));
  }
}

// .. app.properties 的内容如下
disc.title=Sgt. Peppers Lonely Hearts Club Band
disc.artist=The Beatles| 1 | 使用 @PropertySource 将指定位置的属性文件数据加载到 Environment 中 |
Environment 中提供了许多方便的方法用来获取属性文件中的值:
// 属性不存在时使用默认值
env.getProperty("disc.artist", "U2")
// 将属性的值转为特定的类型
int connectionCount =
  env.getProperty("db.connection.count", Integer.class, 30);
// 属性不存在时会抛出异常 IllegalStateException
env.getRequiredProperty("disc.title");
// 检查属性是否存在
boolean titleExists = env.containsProperty("disc.title");
除了Environment,另一种使用属性的方式就是用属性占位符(${ … })在运行时动态注入, XML方式下直接用就可以:
<bean id="sgtPeppers" class="soundsystem.BlankDisc"
      c:_title="${disc.title}" c:_artist="${disc.artist}" />
但在Java中需要使用 @Value 注解:
public BlankDisc(
  @Value("${disc.title}") String title,
  @Value("${disc.artist}") String artist) {
  this.title = title;
  this.artist = artist;
}
但要属性占位符生效,需要配置一个 PropertyPlaceholderConfigurer 或者 PropertySourcesPlaceholderConfigurer
的Bean,Spring 3.1之后的最好使用后者 ,因为可以从Environment中解析属性值(从属性文件中加载的)。
@Bean
public
static PropertySourcesPlaceholderConfigurer placeholderConfigurer() {
  return new PropertySourcesPlaceholderConfigurer();
}
XML中等效的配置为:
<?xml version="1.0" encoding="UTF-8"?>
<beans xmlns="http://www.springframework.org/schema/beans"
  xmlns:xsi="http://www.w3.org/2001/XMLSchema-instance"
  xmlns:context="http://www.springframework.org/schema/context"
  xsi:schemaLocation="
    http://www.springframework.org/schema/beans
    http://www.springframework.org/schema/beans/spring-beans.xsd
    http://www.springframework.org/schema/context
    http://www.springframework.org/schema/context/spring-context.xsd">

    <context:property-placeholder />

</beans>
2.3. Spring AOP
2.3.1. 什么是面向切面编程
-
ADVICE (通知),通知定义了切面是什么( what )和什么时候使用( when ), Spring中可以使用五种类型的通知:
-
Before —— 在方法调被用前调用通知
-
After —— 在方法完成后调用通知,无论方法是否成功
-
After-returning —— 在方法成功执行后调用通知
-
After-throwing —— 在方法抛出异常后调用通知
-
Around —— 包裹被通知的方法,可以在方法调用前后执行自定义的行为
-
-
JOIN POINTS (连接点),在应用执行过程中能够插入切面的一个点,这个点可以是调用方法时、 抛出异常时、甚至修改一个字段时
-
POINTCUTS (切点),切点定义了切面的“何处”( where ),切点会匹配通知所需要织入的一个或多个连接点
-
ASPECTS (切面),切面是通知和切点的结合——它是什么,在何时何处完成其功能
-
INTRODUCTIONS (引入),引入允许我们向已有的类添加新属性或方法
-
WEAVING (织入),织入是将切面应用到目标对象来创建新的代理对象的过程。目标对象的生命周期中有多个点可以织入:
-
编译时——切面在目标类编译时织入,需要使用特殊的编译器比如AspectJ的织入编译器。
-
类加载时——切面在目标类加载到JVM时织入,需要使用特殊的类加载器比如AspectJ 5中的 LTW。
-
运行时——切面在应用运行的某个时间织入,AOP容器会为目标对象动态创建一个代理,Spring AOP就是这种方式
-
Spring支持4种类型的AOP
-
Spring中经典的基于代理的AOP
-
纯POJO的切面
-
@AspectJ注解驱动的切面
-
注入式AspectJ切面
前三种是Spring 自身对AOP实现的变体,Spring AOP是基于动态代理构建的,因此只限于对方法的拦截。
注意@AspectJ注解并不是基于AspectJ的,底层还是Spring基于代理的实现,只不过是Spring从AspectJ借鉴而来, 从而提供与AspectJ一致的编程模型。
2.3.2. 使用pointcuts来选择切入点
在Spring AOP中,需要使用AspectJ的切点表达式语言来定义切点。Spring只支持AspectJ切点指示器(pointcut designator) 的一个子集:
| AspectJ 指示器 | 描述 | 通配符 |
|---|---|---|
args() |
限定匹配的连接点为执行中的方法,且方法参数为指定的类型(动态切入) |
|
@args() |
限定匹配的连接点为执行中的方法,且方法参数的注解为指定的注解类型 |
|
execution() |
匹配的连接点为执行中的方法 |
|
this() |
限定匹配的连接点为AOP代理类所代理Bean的引用为指定类型的类 |
|
target() |
限定匹配的连接点为当前目标对象(被代理对象)类型中的执行方法(只匹配类型,不匹配接口) |
|
@target() |
限定匹配的连接点为当前目标对象类型的执行方法,其中目标对象持有指定的注解 |
|
within() |
限定匹配的连接点为指定类型的对象中的执行方法 |
|
@within() |
限定匹配的连接点为带有指定注解的类型的对象中的执行方法(注解在类型上) |
|
@annotation |
限定匹配带有指定注解的当前执行方法(注解在方法上) |
execution()指示器是唯一的执行匹配,其他的都是限定匹配。 所以execution()是编写切点时主要的指示器,其他的用来做限定。
假如存在:
package springfast;
public interface Performance {
  public void perform();
}
那么拦截 Performance 接口 perform 方法的 pointcut 表达式如下:
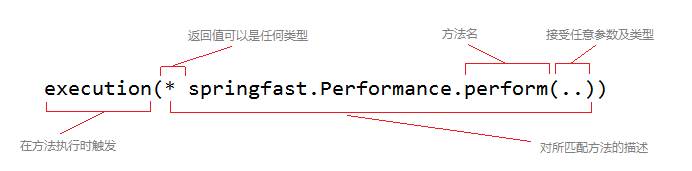
返回值处的星号(*)和参数列表处的双点号(..)表示任意的返回值和参数。
如果想限定拦截的范围,比如当且仅当如上方法在包 org.calvin.springfast 中调用时:
execution(* springfast.Performance.perform(..))
&& within(org.calvin.springfast.*)) (1)| 1 | 这里用 && 来表示 and 的关系,类似的可以使用 || 表示 or , ! 表示 not 。 因为&&在XML中有特殊含义,所以可使用 and 代替 &&,其他也类似。 |
除了上面表格中的指示器,Spring 还引入了新的 bean() 指示器。
bean() 使用 Bean ID或Bean名称作为参数来限制切点只匹配特定的bean:
execution(* springfast.Performance.perform())
and bean('woodstock')2.3.3. 使用注解创建切面
在Spring中使用注解可以很容易地创建一个切面:
package org.calvin.springfast;
import org.aspectj.lang.annotation.AfterReturning;
import org.aspectj.lang.annotation.AfterThrowing;
import org.aspectj.lang.annotation.Aspect;
import org.aspectj.lang.annotation.Before;

@Aspect                                                              (1)
public class Audience {

  @Before("execution(** springfast.Performance.perform(..))")           (2)
  public void silenceCellPhones() {
    System.out.println("Silencing cell phones");
  }

  @Before("execution(** springfast.Performance.perform(..))")
  public void takeSeats() {
    System.out.println("Taking seats");
  }

  @AfterReturning("execution(** springfast.Performance.perform(..))")
  public void applause() {
    System.out.println("CLAP CLAP CLAP!!!");
  }

  @AfterThrowing("execution(** springfast.Performance.perform(..))")
  public void demandRefund() {
    System.out.println("Demanding a refund");
  }

}| 1 | @Aspect 注解将该POJO类变为一个切面 |
| 2 | @Before 注解的方法为一个Advice,在perform方法之前执行 |
上面方法中添加的通知注解指明该方法调用的时机,AspectJ一共定义了五种通知注解:
| 注解 | 通知 |
|---|---|
@After |
(添加该注解的方法)在被拦截方法执行完毕或抛出异常后调用 |
@AfterReturning |
在被拦截方法执行完毕调用 |
@AfterThrowing |
在被拦截方法抛出异常后调用 |
@Around |
包裹被拦截方法的执行 |
@Before |
在被拦截方法执行之前执行 |
上个示例代码中所有通知注解中的pointcut表达式都是一样的,为了减少重复,可以在@Aspect注解的切面中使用 @Pointcut :
...

@Aspect
public class Audience {

  @Pointcut("execution(** springfast.Performance.perform(..))")
  public void performance() {}                                       (1)

  @Before("performance()")
  public void silenceCellPhones() {
    System.out.println("Silencing cell phones");
  }

  @Before("performance()")
  public void takeSeats() {
    System.out.println("Taking seats");
  }

  ...

}| 1 | @Pointcut 注解的方法只是作为标记来引用,不需要定义任何操作 |
仅使用上面的注解并不能让切面生效,若使用JavaConfig,需要在配置类上添加 @EnableAspectJAutoProxy
注解开启 自动代理(auto-proxying) :
@Configuration
@EnableAspectJAutoProxy                                              (1)
@ComponentScan
public class ConcertConfig {

  @Bean
  public Audience audience() {
    return new Audience();                                           (2)
  }

}| 1 | 启用自动代理功能 |
| 2 | 将该切面声明为Bean |
在XML配置环境中,等效的配置项为 <aop:aspectj-autoproxy> :
<?xml version="1.0" encoding="UTF-8"?>
<beans xmlns="http://www.springframework.org/schema/beans"
  xmlns:xsi="http://www.w3.org/2001/XMLSchema-instance"
  xmlns:context="http://www.springframework.org/schema/context"
  xmlns:aop="http://www.springframework.org/schema/aop"              (1)
  xsi:schemaLocation="http://www.springframework.org/schema/aop
    http://www.springframework.org/schema/aop/spring-aop.xsd         (1)
    http://www.springframework.org/schema/beans
    http://www.springframework.org/schema/beans/spring-beans.xsd
    http://www.springframework.org/schema/context
    http://www.springframework.org/schema/context/spring-context.xsd">

  <context:component-scan base-package="org.calvin.springfast" />

  <aop:aspectj-autoproxy />

  <bean class="org.calvin.springfast.Audience" />

</beans>| 1 | 注意添加Spring的aop命名空间 |
自动代理机制会根据 @Aspect 注解的Bean中的通知方法,为其pointcut表达式匹配到的Bean创建代理。
Around通知是最强的通知类型,类似于before和after通知的结合:
@Aspect
public class Audience {

  @Pointcut("execution(** springfast.Performance.perform(..))")
  public void performance() {}

  @Around("performance()")
  public void watchPerformance(ProceedingJoinPoint jp) {
    try {
      System.out.println("Silencing cell phones");
      System.out.println("Taking seats");
      jp.proceed();                                                  (1)
      System.out.println("CLAP CLAP CLAP!!!");
    } catch (Throwable e) {
      System.out.println("Demanding a refund");
    }
  }

}| 1 | 注意参数ProceedingJoinPoint,ProceedingJoinPoint.proceed() 将调用被通知的方法。
如果没有调用,相当于忽略掉被通知的方法。 |
如果要在通知方法中获取被通知方法的参数,需要在pointcut表达式中配合使用 args :
@Aspect
public class TrackCounter {

  @Pointcut(
    "execution(* soundsystem.CompactDisc.playTrack(int)) " +
    "&& args(trackNumber)")                                          (1)
  public void trackPlayed(int trackNumber) {}

  @Before("trackPlayed(trackNumber)")
  public void countTrack(int trackNumber) {
    int currentCount = getPlayCount(trackNumber);
    trackCounts.put(trackNumber, currentCount + 1);
  }

}| 1 | args 的参数跟pointcut标记方法的参数一致,表示任何传给被通知方法playTrack的int参数也同样传给通知方法countTrack。 |
AOP中的 引入(introduction) 能给已有的Bean添加新方法。切面是实现了与所包装Bean相同接口的代理, 引入就是除了实现这些接口,还发布了新的接口,当新接口的方法被调用时,代理将调用委托给实现该接口的其他对象, 有点像一个Bean的实现被拆分到多个类中一样,例如:
public interface Encoreable {
  void performEncore();
}

// 该切面将Encoreable引入到所有Performance接口的实现中
@Aspect
public class EncoreableIntroducer {

  @DeclareParents(value="springfast.Performance+",                   (1)
                  defaultImpl=DefaultEncoreable.class)               (2)
  public static Encoreable encoreable;                               (3)

}| 1 | @DeclareParents 注解的 value 属性使用pointcut表达式指定将被引入新接口的beans |
| 2 | defaultImpl 指定所引入的新接口的实现类 |
| 3 | 添加了 @DeclareParents 注解的静态变量指明了将被引入的新接口 Encoreable |
2.3.4. 在XML中创建切面
在XML中创建切面的方式可以避免对类的修改(不用添加注解)。 Spring 的 aop 命名空间中提供了许多配置元素:
| AOP配置元素 | 描述 |
|---|---|
<aop:advisor> |
定义AOP通知器 |
<aop:after> |
定义后置通知 |
<aop:after-returning> |
定义返回通知 |
<aop:after-throwing> |
定义异常通知 |
<aop:around> |
定义环绕通知 |
<aop:before> |
定义前置通知 |
<aop:aspect> |
定义切面 |
<aop:aspectj-autoproxy> |
启用@AspectJ注解驱动的切面 |
<aop:config> |
顶层的配置元素,大多的<aop:*>元素必须包含在该元素内 |
<aop:declare-parents> |
为被通知对象提供额外接口和实现 |
<aop:pointcut> |
定义切点 |
与之前注解方式配置的切面等效的XML配置如下:
<aop:config>

  <!-- 1.带各种通知的切面 -->
  <aop:aspect ref="audience">                                                   (1)
    <aop:pointcut
      id="performance"
      expression="execution(** springfast.Performance.perform(..))" />

    <aop:before pointcut-ref="performance" method="silenceCellPhones"/>
    <aop:before pointcut-ref="performance" method="takeSeats"/>
    <aop:after-returning  pointcut-ref="performance" method="applause"/>
    <aop:after-throwing
       pointcut="execution(** springfast.Performance.perform(..))"
       method="demandRefund"/>

    <aop:around
       pointcut-ref="performance"
       method="watchPerformance"/>                                              (2)
  </aop:aspect>

  <!-- 2. 往通知方法中传入参数 -->
  <aop:aspect ref="trackCounter">                                               (3)
    <aop:pointcut id="trackPlayed"
      expression= "execution(* soundsystem.CompactDisc.playTrack(int))
      and args(trackNumber)" />                                                 (4)

    <aop:before pointcut-ref="trackPlayed" method="countTrack"/>
  </aop:aspect>

  <!-- 3. 使用切面引入新接口(或功能) -->
  <aop:aspect>
    <aop:declare-parents
      types-matching="springfast.Performance+"
      implement-interface="springfast.Encoreable"
      default-impl="springfast.DefaultEncoreable"                               (5)
      />
  </aop:aspect>
</aop:config>| 1 | audience为前例中去掉所有注解的纯POJO类的bean,并去掉了 @Pointcut 注解的标记方法 |
| 2 | watchPerformance的实现跟之前一样,参数为 ProceedingJoinPoint,
并调用 ProceedingJoinPoint.proceed(),只不过去掉了 @Around 注解 |
| 3 | trackCounter为前例中去掉所有注解的纯POJO类的bean,并去掉了 @Pointcut 注解的标记方法 |
| 4 | 在XML中需要使用 and 代替 && |
| 5 | 如果需要委托的接口实现类是Bean的话可以使用 delegate-ref="encoreableDelegate" 代替 default-impl 属性 |
2.3.5. 使用AspectJ
AspectJ提供了Spring AOP所不支持的许多类型的切点。AspectJ切面与Spring 相互独立, 但如果AspectJ切面在执行通知时依赖于其他的类,虽然可以在切面内部实例化这些类, 但最好的方式还是使用Spring将依赖注入。
比如存在以下切面:
public aspect CriticAspect {
  public CriticAspect() {}

  pointcut performance() : execution(* perform(..));

  afterReturning() : performance() {
    System.out.println(criticismEngine.getCriticism());                         (1)
  }

  private CriticismEngine criticismEngine;
  public void setCriticismEngine(CriticismEngine criticismEngine) {             (2)
    this.criticismEngine = criticismEngine;
  }

}| 1 | 切面在执行时依赖于criticismEngine的实现 |
| 2 | 通过Spring将依赖的CriticismEngine实现注入 |
因为需要使用Spring的依赖注入,需要在配置文件中将切面声明为Bean:
<bean class="com.springinaction.springidol.CriticAspect"
    factory-method="aspectOf">                                                  (1)
  <property name="criticismEngine" ref="criticismEngine" />
</bean>| 1 | CriticAspect切面的实例是由AspectJ创建而不是Spring,为了能将依赖注入到该切面实例中, 需要使用AspectJ的静态方法aspectOf(单例方法)来获取该切面的一个引用。 |
3. Spring Web
3.1. 创建Spring Web应用
3.1.1. Spring MVC 起步
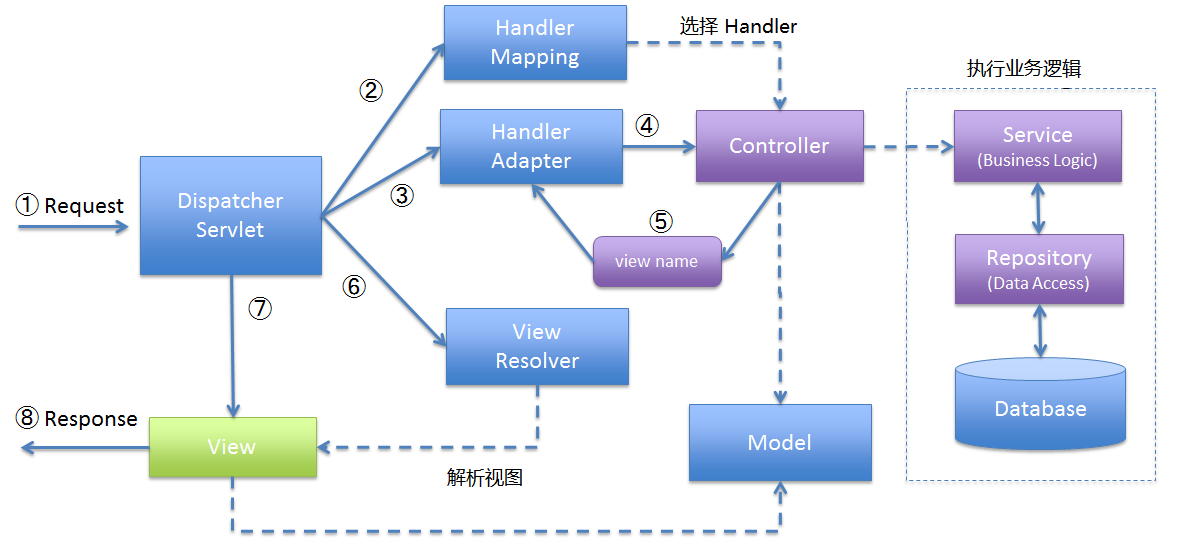
一个请求在Spring MVC中首先会到达 DispatcherServlet , DispatcherServlet 是 Spring MVC 的 前端控制器(front controller,常见的web应用模式) ,这个单例的servlet负责将请求委托给应用的其他组件来执行实际的处理。
请求在Spring MVC中的处理流程如下:
以前Servlet一般都是在web.xml中配置的(当然现在也可以),但根据Servlet 3规范以及从Spring 3.1开始, 我们还可以在Java中配置DispatcherServlet:
package org.calvin.springfast.config;
import org.springframework.web.servlet.support.
    AbstractAnnotationConfigDispatcherServletInitializer;

public class SpittrWebAppInitializer
    extends AbstractAnnotationConfigDispatcherServletInitializer {

  @Override
  protected String[] getServletMappings() {
    return new String[] { "/" };                                     (1)
  }

  @Override
  protected Class<?>[] getRootConfigClasses() {
    return new Class<?>[] { RootConfig.class };                      (2)
  }

  @Override
  protected Class<?>[] getServletConfigClasses() {
    return new Class<?>[] { WebConfig.class };                       (2)
  }
}| 1 | 将DispatcherServlet映射到路径 “/”,可以指定多个路径 |
| 2 | 指定配置类 |
所有继承 AbstractAnnotationConfigDispatcherServletInitializer 的类将被自动识别并用于
配置 DispatcherServlet 以及在servlet上下文(context)中设置Spring 应用上下文(application context)。
|
解读AbstractAnnotationConfigDispatcherServletInitializer
在 Servlet 3.0 环境中,容器会查找classpath下所有实现了 javax.servlet.ServletContainerInitializer 接口的类, 并使用这些类来配置Servlet 容器。 Spring 中提供了一个实现该接口的类 SpringServletContainerInitializer ,这个类添加了 因此任何继承该类的子类在Servlet 3.0 环境中将被容器自动发现并用于配置servlet上下文。 |
注意上面代码中的两个配置类。Spring Web应用中通常会有两个Spring上下文,一个是由DispatcherServlet创建的子上下文, 主要用于创建和加载一些Web组件如控制器(controller)、视图解析器(view resolver)以及处理器映射(handler mapping); 另外一个是由ContextLoaderListener创建的根上下文,主要用于创建和加载一些中间层和数据层的Bean。
因为 AbstractAnnotationConfigDispatcherServletInitializer 已经在底层创建了 DispatcherServlet 和 ContextLoaderListener ,
getServletConfigClasses() 和 getRootConfigClasses() 则分别对应用于配置其中的子上下文和根上下文的配置类。
在Java中配置的方式只适用于支持Servlet 3.0以上的环境,否则还是得在web.xml中配置DispatcherServlet。
在配置类中添加 @EnableWebMvc 注解就可以启用Spring MVC,不过仅使用这个注解只会用到 WebMvcConfigurationSupport 中的默认设置,
通常应该实现 WebMvcConfigurer 接口或直接继承 WebMvcConfigurerAdapter 类并重写相关方法来定制配置项:
@Configuration
@EnableWebMvc                                                                   (1)
@ComponentScan("org.calvin.springfast.web")                                     (2)
public class WebConfig extends WebMvcConfigurerAdapter {

  @Bean
  public ViewResolver viewResolver() {
    InternalResourceViewResolver resolver = new InternalResourceViewResolver(); (3)
    resolver.setPrefix("/WEB-INF/views/");
    resolver.setSuffix(".jsp");
    resolver.setExposeContextBeansAsAttributes(true);
    return resolver;
  }

  @Override
  public void configureDefaultServletHandling(
      DefaultServletHandlerConfigurer configurer) {
    configurer.enable();                                                        (4)
  }

}

// 另外 RootConfig 的代码如下,仅作参考
@Configuration
@ComponentScan(basePackages={"org.calvin.springfast"},
    excludeFilters={
      @Filter(type=FilterType.ANNOTATION, value=EnableWebMvc.class)
    })
public class RootConfig {
}| 1 | 启用Spring MVC |
| 2 | 启用组件扫描 |
| 3 | 配置JSP视图解析器 |
| 4 | 配置对静态资源(如图片、css文件)的处理,将对这些资源的请求转接给容器的servlet |
如果WebMvcConfigurer接口提供的配置项不能满足特殊的定制需求,可以考虑去掉配置类的注解 @EnableWebMvc ,而直接继承
WebMvcConfigurationSupport 或 DelegatingWebMvcConfiguration 。
3.1.2. 编写简单的控制器(Controller)
在Spring MVC中,控制器其实就是一些类,这些类的方法添加了 @RequestMapping 注解以声明方法要处理的请求。
举几个简单的例子:
// 最简单的控制器,映射到路径 “/”
@Controller
public class HomeController {
  @RequestMapping(value="/", method=GET)
  public String home() {
    return "home";
  }
}

// 将RequestMapping添加到类上,类的所有方法的映射路径将继承此路径
@Controller
@RequestMapping("/")
public class HomeController {
  @RequestMapping(method=GET)
  public String home() {
    return "home";
  }
}

// 也可以在RequestMapping中映射多个路径
@Controller
@RequestMapping({"/", "/homepage"})
public class HomeController {
...
}
3.1.3. 处理请求参数
有三种方法可以向控制器的处理方法传入参数:
-
查询(query)参数
-
表单(form)参数
-
路径(path)变量
使用查询参数
如果要处理请求中的查询参数,如 /spittles?max=238900&count=50 中的 max 和 count ,
需要使用 @RequestParam 注解:
// 类级的RequestMapping为 /spittles
private static final String MAX_LONG_AS_STRING =
        Long.toString(Long.MAX_VALUE);

@RequestMapping(method=RequestMethod.GET)
public List<Spittle> spittles(
    @RequestParam(value="max",
                  defaultValue=MAX_LONG_AS_STRING) long max,                    (1)
    @RequestParam(value="count", defaultValue="20") int count) {
  return spittleRepository.findSpittles(max, count);
}| 1 | defaultValue 表示max参数为空时的默认值,因为查询参数都是String,所以只接受String类型, 这个不是必选项 |
使用路径变量
如果要处理请求路径中的一部分,如 /spittles/12345 中的 12345传给后台,需要使用 @PathVariable 注解:
// 类级的RequestMapping为 /spittles
@RequestMapping(value="/{spittleId}", method=RequestMethod.GET)
  public String spittle(
    @PathVariable("spittleId") long spittleId, Model model) {                   (1)
  model.addAttribute(spittleRepository.findOne(spittleId));
  return "spittle";
}| 1 | 如果参数的名字和占位符的相同可以省略PathVariable的value值 |
3.1.4. 处理表单
处理表单提交的一个示例如下:
@Controller
@RequestMapping("/spitter")
public class SpitterController {

  @RequestMapping(value="/register", method=POST)
  public String processRegistration(Spitter spitter) {               (1)
    spitterRepository.save(spitter);
    return "redirect:/spitter/" + spitter.getUsername();             (2)
  }
}| 1 | Spitter 的属性值会自动匹配到同名的请求参数 |
| 2 | InternalResourceViewResolver 对带有 redirect: 前缀的视图名会自动解析为重定向请求,
类似的还有 forward: 前缀会被解析为服务端转发。 |
Spring提供了对 Java Validation API(JSR-303) 的支持,在Spring MVC中不需要做额外的配置, 只要在项目的classpath下存在该API的实现如Hibernate Validator就可以使用。
Java Validation API中有许多用于约束属性值的注解:
| 注解 | 描述 |
|---|---|
@AssertFalse |
被注解元素必须为 Boolean 类型值为 false |
@AssertTrue |
被注解元素必须为 Boolean 类型值为 true |
@DecimalMax |
被注解元素必须为数值类型且值小于等于给定的BigDecimal字符串 |
@DecimalMin |
被注解元素必须为数值类型且值大于等于给定的BigDecimal字符串 |
@Digits |
被注解元素必须为数值类型且值为指定的数 |
@Future |
被注解元素必须为将来的某一个时间(date) |
@Past |
被注解元素必须为过去的某一个时间(date) |
@Max |
被注解元素必须为数值类型且值小于等于给定的值 |
@Min |
被注解元素必须为数值类型且值大于等于给定的值 |
@NotNull |
被注解元素的值必须必须不能为null |
@Null |
被注解元素的值必须必须为null |
@Pattern |
被注解元素的值必须匹配给定的正则表达式 |
@Size |
被注解元素的值必须为String,集合(collection)或数组,其大小在指定的范围内 |
以上只是部分约束注解,一个示例:
public class Spitter {
  private Long id;

  @NotNull
  @Size(min=5, max=16)
  private String username;

  @NotNull
  @Size(min=5, max=25)
  private String password;

  @NotNull
  @Size(min=2, max=30)
  private String firstName;

  @NotNull
  @Size(min=2, max=30)
  private String lastName;                                           (1)
  ...
}
// ...
@RequestMapping(value="/register", method=POST)
public String processRegistration(
  @Valid Spitter spitter,                                            (2)
  Errors errors) {                                                   (3)
  if (errors.hasErrors()) {
    return "registerForm";
  }
  spitterRepository.save(spitter);
  return "redirect:/spitter/" + spitter.getUsername();
}| 1 | lastName 不能为null,字符长度在2~30之间 |
| 2 | @Valid 指示Spring对注解的参数验证是否满足约束 |
| 3 | 如果某个约束验证失败可以从 Errors 中查到, Errors 必须紧跟在添加了 @Valid 注解的参数后面 |
3.2. 展示Web视图
3.2.1. 视图的解析
Spring MVC中的视图解析器是为了将处理请求的逻辑与视图的展现解耦。
Spring MVC定义了 ViewResolver 和 View 接口:
public interface ViewResolver {
  View resolveViewName(String viewName, Locale locale) throws Exception;
}

public interface View {
  String getContentType();
  void render(Map<String, ?> model,
              HttpServletRequest request,
              HttpServletResponse response) throws Exception;
}
这两个接口可用于实现自定义的视图解析过程。
Spring已经提供许多开箱即用的视图解析器:
| 视图解析器 | 描述 |
|---|---|
BeanNameViewResolver |
在Spring上下文中查找bean id与逻辑视图名匹配的View的实现 |
ContentNegotiatingViewResolver |
根据客户端的请求内容类型将视图的请求委托给能产生该类型内容的视图解析器 |
FreeMarkerViewResolver |
查找FreeMarker模版 |
InternalResourceViewResolver |
查找应用内的资源(通常是JSP) |
JasperReportsViewResolver |
查找JasperReports报表文件 |
ResourceBundleViewResolver |
根据属性文件(property file)查找视图View的实现 |
TilesViewResolver |
查找Tiles模板文件 |
UrlBasedViewResolver |
直接使用视图名查找物理位置所在的视图 |
VelocityLayoutViewResolver |
使用多个Velocity模板组合为页面 |
VelocityViewResolver |
解析为Velocity模板的视图 |
XmlViewResolver |
从XML文件中查找View的实现,类似于BeanNameViewResolver |
XsltViewResolver |
解析为XSLT的视图 |
3.2.2. 创建JSP视图
InternalResourceViewResolver 使用 前缀(prefix) 和 后缀(suffix) 并组合上逻辑视图名来 定位物理位置上的视图资源。
比如要匹配到 /WEB-INF/views/ 路径下的JSP文件,在Java中可以这么配置:
@Bean
public ViewResolver viewResolver() {
  InternalResourceViewResolver resolver = new InternalResourceViewResolver();
  resolver.setPrefix("/WEB-INF/views/");
  resolver.setSuffix(".jsp");
  return resolver;
}
XML中等效的配置为:
<bean id="viewResolver"
      class="org.springframework.web.servlet.view.InternalResourceViewResolver"
      p:prefix="/WEB-INF/views/"
      p:suffix=".jsp" />
这样当使用视图名比如 home 时,实际返回的会是 /WEB-INF/views/home.jsp 。
3.3. Spring MVC的高级用法
3.3.1. 备选的Spring MVC配置方式
在之前使用 AbstractAnnotationConfigDispatcherServletInitializer 配置时只重载了3个必要的方法,
还可以重载其他方法以提供更多配置项。比如 customizeRegistration() ,这个方法是在 DispatcherServlet
被注册到servlet容器后调用,参数为 ServletRegistration.Dynamic ,比如:
@Override
protected void customizeRegistration(Dynamic registration) {
  registration.setMultipartConfig(
    new MultipartConfigElement("/tmp/spittr/uploads"));
}
ServletRegistration.Dynamic 中可配置的项包括 setLoadOnStartup 设置加载优先级,
setInitParameter 设置初始化参数, setMultipartConfig 配置对Servlet 3.0 mutipart的支持。
AbstractAnnotationConfigDispatcherServletInitializer 只创建了 DispatcherServlet 和 ContextLoaderListener ,如果要添加其他的servlet、filter和listener就得定义自己的 初始化器类(initializer),最简单的方式就是实现 WebApplicationInitializer 接口 :
package com.myapp.config;
import javax.servlet.ServletContext;
import javax.servlet.ServletException;
import javax.servlet.ServletRegistration.Dynamic;
import org.springframework.web.WebApplicationInitializer;
import com.myapp.MyServlet;
import com.myapp.MyFilter;

public class MyServletInitializer implements WebApplicationInitializer {
  @Override
  public void onStartup(ServletContext servletContext) throws ServletException {
    Dynamic myServlet =
              servletContext.addServlet("myServlet", MyServlet.class);          (1)
    myServlet.addMapping("/custom/**");

    javax.servlet.FilterRegistration.Dynamic filter =
              servletContext.addFilter("myFilter", MyFilter.class);             (1)
    filter.addMappingForUrlPatterns(null, false, "/custom/*");
  }
}| 1 | 注册servle和filter |
这种方式适合自定义servlet和filter的映射和配置,如果是直接将filter映射到 DispatcherServlet ,
还有种可选的方式是重写 AbstractAnnotationConfigDispatcherServletInitializer 中的 getServletFilters :
@Override
protected Filter[] getServletFilters() {
  return new Filter[] { new MyFilter() };                            (1)
}| 1 | 该方法返回的所有filter都将自动映射到 DispatcherServlet |
以上的所有在java中配置servlet、filter和listener的方式只适用于部署到servlet 3.0环境的应用,
如果不喜欢这种配置方式或是不得不在servlet低于3.0的环境下部署应用,可以使用传统的 web.xml 配置方式:
<?xml version="1.0" encoding="UTF-8"?>
<web-app version="2.5"
  xmlns="http://java.sun.com/xml/ns/javaee"
  xmlns:xsi="http://www.w3.org/2001/XMLSchema-instance"
  xsi:schemaLocation="http://java.sun.com/xml/ns/javaee
      http://java.sun.com/xml/ns/javaee/web-app_2_5.xsd">

  <context-param>
    <param-name>contextConfigLocation</param-name>
    <param-value>/WEB-INF/spring/root-context.xml</param-value>                 (1)
  </context-param>

  <listener>
    <listener-class>
      org.springframework.web.context.ContextLoaderListener                     (2)
    </listener-class>
  </listener>

  <servlet>
    <servlet-name>appServlet</servlet-name>
    <servlet-class>
      org.springframework.web.servlet.DispatcherServlet
    </servlet-class>
    <init-param>
    <param-name>contextConfigLocation</param-name>
    <param-value>
      /WEB-INF/spring/appServlet/servlet-context.xml                            (3)
    </param-value>
    </init-param>
    <load-on-startup>1</load-on-startup>
  </servlet>

  <servlet-mapping>
    <servlet-name>appServlet</servlet-name>                                     (4)
    <url-pattern>/</url-pattern>
  </servlet-mapping>
</web-app>| 1 | 配置Spring根上下文的路径,多个xml文件可以使用 , 分隔 |
| 2 | 注册ContextLoaderListener |
| 3 | 配置DispatcherServlet中的Spring子上下文的路径 |
| 4 | 将DispatcherServlet映射到路径 “/” |
这个web.xml加载Spring的配置文件也是XML,对于使用JavaConfig配置Spirng的方式,
需要修改 DispatcherServlet 和 ContextLoaderListener 的 contextClass 参数:
<?xml version="1.0" encoding="UTF-8"?>
<web-app version="2.5"
  xmlns="http://java.sun.com/xml/ns/javaee"
  xmlns:xsi="http://www.w3.org/2001/XMLSchema-instance"
  xsi:schemaLocation="http://java.sun.com/xml/ns/javaee
      http://java.sun.com/xml/ns/javaee/web-app_2_5.xsd">

  <context-param>
    <param-name>contextClass</param-name>
    <param-value>
      org.springframework.web.context.support.AnnotationConfigWebApplicationContext
    </param-value>
  </context-param>

  <context-param>
    <param-name>contextConfigLocation</param-name>
    <param-value>com.habuma.spitter.config.RootConfig</param-value>             (1)
  </context-param>

  <listener>
    <listener-class>
      org.springframework.web.context.ContextLoaderListener
    </listener-class>
  </listener>

  <servlet>
    <servlet-name>appServlet</servlet-name>
    <servlet-class>
      org.springframework.web.servlet.DispatcherServlet
    </servlet-class>
    <init-param>
      <param-name>contextClass</param-name>
      <param-value>
        org.springframework.web.context.support.AnnotationConfigWebApplicationContext
      </param-value>
    </init-param>
    <init-param>
      <param-name>contextConfigLocation</param-name>
      <param-value>
        com.habuma.spitter.config.WebConfigConfig                               (2)
      </param-value>
    </init-param>
    <load-on-startup>1</load-on-startup>
  </servlet>

  <servlet-mapping>
    <servlet-name>appServlet</servlet-name>
    <url-pattern>/</url-pattern>
  </servlet-mapping>
</web-app>| 1 | Spring根上下文配置类 |
| 2 | DispatcherServlet的Spring上下文配置类 |
3.3.2. 处理multipart表单数据
配置对mutipart的支持
multipart表单将表单数据拆分成多个独立的部分,每个部分对应一个表单域(field)而且可以有自己的类型,比如:
------WebKitFormBoundaryqgkaBn8IHJCuNmiW
Content-Disposition: form-data; name="firstName"

Charles
------WebKitFormBoundaryqgkaBn8IHJCuNmiW
Content-Disposition: form-data; name="lastName"

Xavier
------WebKitFormBoundaryqgkaBn8IHJCuNmiW
Content-Disposition: form-data; name="email"

charles@xmen.com
------WebKitFormBoundaryqgkaBn8IHJCuNmiW
Content-Disposition: form-data; name="username"

professorx
------WebKitFormBoundaryqgkaBn8IHJCuNmiW
Content-Disposition: form-data; name="password"

letmein01
------WebKitFormBoundaryqgkaBn8IHJCuNmiW
Content-Disposition: form-data; name="profilePicture"; filename="me.jpg"
Content-Type: image/jpeg

[[ Binary image data goes here ]]
------WebKitFormBoundaryqgkaBn8IHJCuNmiW--
DispatcherServlet 不会解析multipart请求中的数据,而是委托给 MultipartResolver 接口解析其中的内容。 从Spring 3.1起,该接口就有两个开箱即用的实现可供选择:
-
CommonsMultipartResolver ,使用 Jakarta Commons FileUpload 解析mutipart请求
-
StandardServletMultipartResolver ,依靠 Servlet 3.0 对mutipart请求的支持。 这个应该首选,利用底层容器的支持而不需要添加其他依赖项。
StandardServletMultipartResolver 的使用非常简单,只需要将其声明为Bean即可:
@Bean
public MultipartResolver multipartResolver() throws IOException {
  return new StandardServletMultipartResolver();                     (1)
}| 1 | 这里不能配置文件上传路径、文件大小限制等参数 |
但只是这样不会使其生效,必须在配置 DispatcherServlet 的时候同时配置mutipart的细节如上传文件的路径(路径是必须的)才可以使用。
如果使用 AbstractAnnotationConfigDispatcherServletInitializer 就重写方法 customizeRegistration :
@Override
protected void customizeRegistration(Dynamic registration) {
  registration.setMultipartConfig(
      new MultipartConfigElement("/tmp/spittr/uploads"));
}
MultipartConfigElement 的构造函数还可以接受其他参数配置对文件或请求的限制:
-
每个上传文件的最大值(字节),默认没有限制
-
整个mutipart请求的最大值(字节),因为可以上传多个文件,这个限制很有意义,默认没有限制
-
上传文件的最大缓冲值,超过该值后将被写入磁盘,默认没有限制,也就是直接写入磁盘。
如果在 web.xml 中配置 DispatcherServlet 的方式需要使用 <multipart-config> :
<servlet>
  <servlet-name>appServlet</servlet-name>
  <servlet-class>
    org.springframework.web.servlet.DispatcherServlet
  </servlet-class>
  <load-on-startup>1</load-on-startup>
  <multipart-config>
    <location>/tmp/spittr/uploads</location>
    <max-file-size>2097152</max-file-size>
    <max-request-size>4194304</max-request-size>
  </multipart-config>
</servlet>
非Servlet 3.0 环境可以使用 CommonsMultipartResolver ,不同的是,上传路径不是必须配置项, 默认的上传路径为容器的临时文件夹,而且可以直接在声明Bean的时候把各种参数配置好:
@Bean
public MultipartResolver multipartResolver() throws IOException {
  CommonsMultipartResolver multipartResolver = new CommonsMultipartResolver();
  multipartResolver.setUploadTempDir(
      new FileSystemResource("/tmp/spittr/uploads"));
  multipartResolver.setMaxUploadSize(2097152);
  multipartResolver.setMaxInMemorySize(0);
  return multipartResolver;
}
处理mutipart请求
在Controller方法中处理mutipart请求上传的文件最常用的是在参数上添加 @RequestPart 注解,
参数的一种方式是使用 byte 数组:
@RequestMapping(value="/register", method=POST)
public String processRegistration(
    @RequestPart("profilePicture") byte[] profilePicture,
    @Valid Spitter spitter,
    Errors errors) {
      ...
}
这种方式的缺点是无法得知上传文件的类型、文件名等信息。另一种方式是使用 MultipartFile , 可以参考下该接口的代码:
public interface MultipartFile {
  String getName();
  String getOriginalFilename();
  String getContentType();
  boolean isEmpty();
  long getSize();
  byte[] getBytes() throws IOException;
  InputStream getInputStream() throws IOException;
  void transferTo(File dest) throws IOException;
}
如果是在Servlet 3.0 环境下,还有一个备选就是 javax.servlet.http.Part , Part 跟 MultipartFile 许多地方都是一样的:
// Part 的接口
public interface Part {
  public InputStream getInputStream() throws IOException;
  public String getContentType();
  public String getName();
  public String getSubmittedFileName();
  public long getSize();
  public void write(String fileName) throws IOException;
  public void delete() throws IOException;
  public String getHeader(String name);
  public Collection<String> getHeaders(String name);
  public Collection<String> getHeaderNames();
}

// 使用 Part
@RequestMapping(value="/register", method=POST)
public String processRegistration(
    @RequestPart("profilePicture") Part profilePicture,
    @Valid Spitter spitter,
    Errors errors) {
      profilePicture.write("/data/spittr/" +
        profilePicture.getOriginalFilename());
      ...
}
3.3.3. 处理异常
Spring提供了一些能将异常转为响应(responses)的方式:
-
特定的Spring异常会被自动转为HTTP状态码
-
给异常添加
@ResponseStatus注解可以将其映射到某个HTTP状态码 -
在方式添加
@ExceptionHandler注解处理异常
Spring自带的异常与HTTP状态码的映射为:
| Spring异常 | HTTP状态码 |
|---|---|
BindException |
400 - Bad Request |
ConversionNotSupportedException |
500 - Internal Server Error |
HttpMediaTypeNotAcceptableException |
406 - Not Acceptable |
HttpMediaTypeNotSupportedException |
415 - Unsupported Media Type |
HttpMessageNotReadableException |
400 - Bad Request |
HttpMessageNotWritableException |
500 - Internal Server Error |
HttpRequestMethodNotSupportedException |
405 - Method Not Allowed |
MethodArgumentNotValidException |
400 - Bad Request |
MissingServletRequestParameterException |
400 - Bad Request |
MissingServletRequestPartException |
400 - Bad Request |
NoSuchRequestHandlingMethodException |
404 - Not Found |
TypeMismatchException |
400 - Bad Request |
以上是在 DispatcherServlet 或是执行验证时可能抛出的异常,而应用内的异常默认为 500 - Internal Server Error ,
使用 @ResponseStatus 可以自定义应用异常的HTTP状态码:
// 使用 @ResponseStatus自定义异常的映射
package org.calvin.springfast.web;
import org.springframework.http.HttpStatus;
import org.springframework.web.bind.annotation.ResponseStatus;
@ResponseStatus(value=HttpStatus.NOT_FOUND,
                reason="Spittle Not Found")
public class SpittleNotFoundException extends RuntimeException {
}

// ...SpittleNotFoundException被抛出时,返回 404 - Spittle Not Found
@RequestMapping(value="/{spittleId}", method=RequestMethod.GET)
public String spittle(
    @PathVariable("spittleId") long spittleId,
    Model model) {
  Spittle spittle = spittleRepository.findOne(spittleId);
  if (spittle == null) {
    throw new SpittleNotFoundException();
  }
  model.addAttribute(spittle);
  return "spittle";
}
相比异常出现时返回状态码,可能更希望像处理正常的请求那样返回一个错误页面的视图名, 或是自定义的responsebody,虽然可以在处理请求的方法中直接捕获异常,然后再如此处理, 但会使代码显得臃肿。
可以在controller的异常处理方法上添加 @ExceptionHandler 注解来拦截指定异常:
@ExceptionHandler(DuplicateSpittleException.class)                   (1)
public String handleDuplicateSpittle() {
  return "error/duplicate";                                          (2)
}| 1 | 指定该方法捕获的异常类型 |
| 2 | 返回逻辑视图名,跟正常的请求处理方法一样 |
该方法只会捕获当前controller中的 任意 请求处理方法抛出的 DuplicateSpittleException 。 如果要捕获 任意 controller中的 任意 请求处理方法抛出的异常,需要配合 通知型控制器 。
3.3.4. 通知型控制器(Advising controllers)
Spring 3.2 新增了一种 控制器通知 用于拦截所有的控制器。一个通知型控制器就是添加了 @ControllerAdvice
并包含至少以下一种类型方法的类:
-
@ExceptionHandler注解的方法 -
@InitBinder注解的方法 -
@ModelAttribute注解的方法
以上在通知型控制器的方法中将被用于应用所有的控制器中添加了 @RequestMapping 的方法。
@ControllerAdvice 注解本身添加了 @Component 注解,因此添加该注解的类会被组件扫描发现。
一个最实用的场景就是使用 @ControllerAdvice 和 @ExceptionHandler 在一个类中处理所有控制器可能抛出的异常:
@ControllerAdvice
public class AppWideExceptionHandler {
  @ExceptionHandler(DuplicateSpittleException.class)
  public String duplicateSpittleHandler() {
    return "error/duplicate";
  }
}
3.3.5. 在重定向请求中携带数据
在处理完 POST 请求后建议做一次重定向,这样可以避免客户端在刷新或点击后退按钮时重复提交。
我们在前面见过 redirect: 的用法。当一个控制器方法返回以 redirect: 开头的字符串,这个字符串不会被用来查找视图,
而是直接作为浏览器重定向到的路径(返回302状态码,并设置HTTP头的location字段为重定向地址)。
重定向实际上是两个请求,那么怎样在后续请求中继续使用之前请求中的数据呢?有两种途径可以解决:
-
使用URL模板,并将数据作为路径变量( path variable )或是请求参数( query parameter )
-
使用 flash 属性 传递数据
使用URL模板
使用路径变量和请求参数的方式看上去实现很简单,把参数作为字符串拼接起来就可以了。 但在URL和SQL中使用字符串拼接并不安全。
Spring中提供了URL模板的方式:
@RequestMapping(value="/register", method=POST)
public String processRegistration(Spitter spitter, Model model) {
  spitterRepository.save(spitter);
  model.addAttribute("username", spitter.getUsername());             (1)
  model.addAttribute("spitterId", spitter.getId());                  (2)
  return "redirect:/spitter/{username}";                             (3)
}| 1 | 必须在 Model 中设置占位符 username 的值 |
| 2 | spitterId 并没有对应的占位符,因此将作为请求参数拼接到路径后如 /spitter/habuma?spitterId=42 |
| 3 | username 中所有不安全(或非法)的字符将被转义 |
这种传数据的方式简单直接,但只对简单的字符串和数值类型友好,复杂的数据就不方便了。
使用 flash 属性
这种方式适用于传递复杂的对象数据。Spring负责将这些数据临时保存到session中,并在重定向后清理掉。
Spring 3.1 中新增了一个 Model 的子接口 RedirectAttributes 用于设置 flash 属性, 比如可以使用 addFlashAttribute() :
// 第一个请求
@RequestMapping(value="/register", method=POST)
public String processRegistration(Spitter spitterA, RedirectAttributes model) {
  spitterRepository.save(spitterA);
  model.addAttribute("username", spitterA.getUsername());
  model.addFlashAttribute("spitter", spitterA);                       (1)
  return "redirect:/spitter/{username}";
}

// 被重定向到的请求
@RequestMapping(value="/spitter/{username}", method=GET)
public String showSpitterProfile(@PathVariable String username, Model model) {
  if (!model.containsAttribute("spitter")) {
    model.addAttribute(
    spitterRepository.findByUsername(username));
  }
  return "profile";
}| 1 | 或者也可以使用 model.addFlashAttribute(spitterA); ,这样将根据类型推导出key的值为 spitter |
第一个请求处理结束后, Model 中的 flash 属性被存入到session中。 而在被重定向到的请求处理之前,所有的 flash 属性从session中取出(然后清理掉)并放入该请求中的 Model 里。
4. Spring Backend
4.1. 使用Spring JDBC玩转数据库
4.1.1. Spring的数据访问思想
了解spring数据访问层的异常体系
我们知道在使用JDBC的时候必须得捕获 SQLException ,但从这个异常并不能获知错误的细节或如何处理。 该异常可能由以下情况导致:
-
应用无法连接到数据库
-
正在执行的查询语句存在语法错误
-
查询中使用的表或列名不存在
-
执行 insert 或 update 时违背数据库的约束条件
-
…
对异常的处理既要能捕获到具体的细节,又不能太依赖框架的实现(比如Hibernate的异常体系), 这正是 Spring 的异常所解决的问题。
| JDBC 异常类 | Spring 异常类 |
|---|---|
BatchUpdateException DataTruncation SQLException SQLWarning |
BadSqlGrammarException CannotAcquireLockException CannotSerializeTransactionException CannotGetJdbcConnectionException CleanupFailureDataAccessException ConcurrencyFailureException DataAccessException DataAccessResourceFailureException DataIntegrityViolationException DataRetrievalFailureException DataSourceLookupApiUsageException DeadlockLoserDataAccessException DuplicateKeyException EmptyResultDataAccessException IncorrectResultSizeDataAccessException IncorrectUpdateSemanticsDataAccessException InvalidDataAccessApiUsageException InvalidDataAccessResourceUsageException InvalidResultSetAccessException JdbcUpdateAffectedIncorrectNumberOfRowsException LobRetrievalFailureException NonTransientDataAccessResourceException OptimisticLockingFailureException PermissionDeniedDataAccessException PessimisticLockingFailureException QueryTimeoutException RecoverableDataAccessException SQLWarningException SqlXmlFeatureNotImplementedException TransientDataAccessException TransientDataAccessResourceException TypeMismatchDataAccessException UncategorizedDataAccessException UncategorizedSQLException |
Spring 的异常类都继承于 DataAccessException ,而 DataAccessException 是非检查异常( unchecked exception )。 Spring的立场是:多数异常应该抛出而不是被捕获,Spring将捕获处理具体的异常与否交由开发者来决定。
对数据的访问模版化
Spring自带的一些数据访问模版类:
模板类( org.springframework.* `) |
用途 |
|---|---|
jca.cci.core.CciTemplate |
JCA CCI 连接 |
jdbc.core.JdbcTemplate |
JDBC连接 |
jdbc.core.namedparam.NamedParameterJdbcTemplate |
JDBC连接,支持命名参数 |
jdbc.core.simple.SimpleJdbcTemplate |
JDBC连接,使用Java 5简化(自Spring 3.1已废弃) |
orm.hibernate3.HibernateTemplate |
Hibernate 3.x+ sessions |
orm.ibatis.SqlMapClientTemplate |
iBATIS SqlMap clients |
orm.jdo.JdoTemplate |
JDO |
orm.jpa.JpaTemplate |
JPA实体管理器 |
4.1.2. 配置数据源
使用JNDI数据源
使用Spring jee 命名空间中的 <jee:jndi-lookup> 元素可以获取JNDI中的任意对象——包括数据源——并将其作为Bean以供使用。
在XML中配置为:
<jee:jndi-lookup id="dataSource"
    jndi-name="/jdbc/SpitterDS"                                      (1)
resource-ref="true" /> (2)| 1 | 用于从JNDI中查找的名称 |
| 2 | 若应用运行在java应用服务器中,将 resource-ref 设为 true 会在 jndi-name 中添加 java:comp/env/ 前缀 |
在Java中配置需要使用 JndiObjectFactoryBean 从JNDI中获取数据源:
@Bean
public JndiObjectFactoryBean dataSource() {
  JndiObjectFactoryBean jndiObjectFB = new JndiObjectFactoryBean();
  jndiObjectFB.setJndiName("jdbc/SpittrDS");
  jndiObjectFB.setResourceRef(true);
  jndiObjectFB.setProxyInterface(javax.sql.DataSource.class);
  return jndiObjectFB;
}
使用池化(pooled)数据源
现今有很多开源的数据源连接池库,其中大多数在Spring中的配置都类似于Spring自带的 DriverManagerDataSource 和 SingleConnectionDataSource 。比如 DBCP 的 BasicDataSource :
<bean id="dataSource" class="org.apache.commons.dbcp.BasicDataSource"
      p:driverClassName="org.h2.Driver"
      p:url="jdbc:h2:tcp://localhost/~/spitter"
      p:username="sa"
      p:password=""
      p:initialSize="5"
      p:maxActive="10" />
或是在Java中:
@Bean
public BasicDataSource dataSource() {
  BasicDataSource ds = new BasicDataSource();
  ds.setDriverClassName("org.h2.Driver");
  ds.setUrl("jdbc:h2:tcp://localhost/~/spitter");
  ds.setUsername("sa");
  ds.setPassword("");
  ds.setInitialSize(5);
  ds.setMaxActive(10);
  return ds;
}
更多的属性配置项建议阅读相关连接池库的文档。
使用基于JDBC驱动的数据源
Spring中提供了三种基于驱动的数据源:
-
DriverManagerDataSource ——每次请求时返回一个 新 连接,该连接是非池化的。
-
SimpleDriverDataSource ——类似于 DriverManagerDataSource ,不过它直接使用JDBC驱动以避免在特定环境下类加载的问题。
-
SingleConnectionDataSource ——每次请求时返回 同一个 连接。
这些配置起来跟DBCP的数据源一样简单,比如在Java中配置 DriverManagerDataSource :
@Bean
public DataSource dataSource() {
  DriverManagerDataSource ds = new DriverManagerDataSource();
  ds.setDriverClassName("org.h2.Driver");
  ds.setUrl("jdbc:h2:tcp://localhost/~/spitter");
  ds.setUsername("sa");
  ds.setPassword("");
  return ds;
}
等效的XML配置为:
<bean id="dataSource"
      class="org.springframework.jdbc.datasource.DriverManagerDataSource"
      p:driverClassName="org.h2.Driver"
      p:url="jdbc:h2:tcp://localhost/~/spitter"
      p:username="sa"
      p:password="" />
这类数据源适用于小型应用或开发环境,不要在其他情况下使用。
使用嵌入式数据源
嵌入式数据库非常适合测试或开发环境:不用连接到外部的数据库服务器,每次重启应用后会被重置。
如下是使用Spring jdbc 命名空间来配置一个预加载测试数据的H2数据库的示例:
<?xml version="1.0" encoding="UTF-8"?>
<beans xmlns="http://www.springframework.org/schema/beans"
    xmlns:xsi="http://www.w3.org/2001/XMLSchema-instance"
    xmlns:jdbc="http://www.springframework.org/schema/jdbc"
    xmlns:c="http://www.springframework.org/schema/c"
    xsi:schemaLocation="http://www.springframework.org/schema/jdbc
      http://www.springframework.org/schema/jdbc/spring-jdbc-3.1.xsd
      http://www.springframework.org/schema/beans
      http://www.springframework.org/schema/beans/spring-beans.xsd">

  <jdbc:embeddeddatabase id="dataSource" type="H2">                             (1)
     <jdbc:script location="com/habuma/spitter/db/jdbc/schema.sql"/>
     <jdbc:script location="com/habuma/spitter/db/jdbc/test-data.sql"/>
  </jdbc:embedded-database>

</beans>| 1 | type 还可以设为 DERBY 来嵌入 Apache Derby 数据库;通过 id 可获取/注入该嵌入式数据源 |
在Java中的配置:
@Bean
public DataSource dataSource() {
return new EmbeddedDatabaseBuilder()
            .setType(EmbeddedDatabaseType.H2)
            .addScript("classpath:schema.sql")
            .addScript("classpath:test-data.sql")
            .build();
}
使用profile选择数据源
使用Spring的profile非常适合于在不同环境下切换不同的数据源。
比如在Java配置中:
package org.calvin.springfast.config;
import org.apache.commons.dbcp.BasicDataSource;
import javax.sql.DataSource;
import org.springframework.context.annotation.Bean;
import org.springframework.context.annotation.Configuration;
import org.springframework.context.annotation.Profile;
import org.springframework.jdbc.datasource.embedded.EmbeddedDatabaseBuilder;
import org.springframework.jdbc.datasource.embedded.EmbeddedDatabaseType;
import org.springframework.jndi.JndiObjectFactoryBean;

@Configuration
public class DataSourceConfiguration {

  @Profile("development")
  @Bean
  public DataSource embeddedDataSource() {
    return new EmbeddedDatabaseBuilder()
                .setType(EmbeddedDatabaseType.H2)
                .addScript("classpath:schema.sql")
                .addScript("classpath:test-data.sql")
                .build();
  }

  @Profile("qa")
  @Bean
  public DataSource Data() {
    BasicDataSource ds = new BasicDataSource();
    ds.setDriverClassName("org.h2.Driver");
    ds.setUrl("jdbc:h2:tcp://localhost/~/spitter");
    ds.setUsername("sa");
    ds.setPassword("");
    ds.setInitialSize(5);
    ds.setMaxActive(10);
    return ds;
  }

  @Profile("production")
  @Bean
    public DataSource dataSource() {
    JndiObjectFactoryBean jndiObjectFactoryBean = new JndiObjectFactoryBean();
    jndiObjectFactoryBean.setJndiName("jdbc/SpittrDS");
    jndiObjectFactoryBean.setResourceRef(true);
    jndiObjectFactoryBean.setProxyInterface(javax.sql.DataSource.class);
    return (DataSource) jndiObjectFactoryBean.getObject();
  }
}
等效的XML配置为:
<?xml version="1.0" encoding="utf-8"?>

<beans xmlns="http://www.springframework.org/schema/beans"
      xmlns:xsi="http://www.w3.org/2001/XMLSchema-instance"
      xmlns:jdbc="http://www.springframework.org/schema/jdbc"
      xmlns:jee="http://www.springframework.org/schema/jee"
      xmlns:p="http://www.springframework.org/schema/p"
      xsi:schemaLocation="http://www.springframework.org/schema/jdbc
        http://www.springframework.org/schema/jdbc/spring-jdbc-3.1.xsd
        http://www.springframework.org/schema/jee
        http://www.springframework.org/schema/jee/spring-jee-3.1.xsd
        http://www.springframework.org/schema/beans
        http://www.springframework.org/schema/beans/spring-beans.xsd">

  <beans profile="development">
    <jdbc:embeddeddatabase id="dataSource" type="H2">
      <jdbc:script location="com/hab uma/spitter/db/jdbc/schema.sql"/>
      <jdbc:script location="com/habum a/spitter/db/jdbc/test-data.sql"/>
    </jdbc:embeddeddatabase>
  </beans>

  <beans profile="qa">
    <bean id="dataSource" class="org.apache.commons.dbcp.BasicDataSource"
          p:driverClassName="org.h2.Driver"
          p:url="jdbc:h2:tcp://localhost/~/spitter"
          p:username="sa" p:password=""
          p:initialSize="5" p:maxActive="10"/>
  </beans>

  <beans profile="production">
    <jee:jndi-lookup id="dataSource"
          jndi-name="/jdbc/SpitterDS"
          resource-ref="true"/>
  </beans>
</beans>
4.1.3. 使用 Spring JDBC
经考验证明比较好的存储数据方式还是JDBC。JDBC毕竟不需要额外掌握一种框架,而且基于SQL, 可以很方便的调整优化,完全掌控应用对数据的存取。
Spring JDBC 减少了直接使用JDBC时连接管理和异常处理的代码,并提供了三个JDBC模板类:
-
JdbcTemplate ——Spirng JDBC模板类的基本款,提供基于索引参数的查询
-
NamedParameterJdbcTemplate ——提供可绑定命名参数的查询
-
SimpleJdbcTemplate ——利用Java 5的特性简化JDBC模板的使用,从Spring 3.1开始已经废弃
配置 JdbcTemplate 只要提供一个 DataSource :
@Bean
public JdbcTemplate jdbcTemplate(DataSource dataSource) {
  return new JdbcTemplate(dataSource);
}
[TBD]
4.5. 缓存数据
4.5.1. 开启缓存
Spring中使用缓存有两种形式:基于注解和基于XML。
如果使用Java配置方式,可以在配置类添加 @EnableCaching 开启缓存:
@Configuration
@EnableCaching                                                       (1)
public class CachingConfig {
  @Bean
  public CacheManager cacheManager() {
    return new ConcurrentMapCacheManager();                          (2)
  }
}| 1 | 开启缓存功能 |
| 2 | 声明缓存管理器 |
在XML中配置如下:
<?xml version="1.0" encoding="UTF-8"?>
<beans xmlns="http://www.springframework.org/schema/beans"
  xmlns:xsi="http://www.w3.org/2001/XMLSchema-instance"
  xmlns:cache="http://www.springframework.org/schema/cache"
  xsi:schemaLocation="
    http://www.springframework.org/schema/beans
    http://www.springframework.org/schema/beans/spring-beans.xsd
    http://www.springframework.org/schema/cache
    http://www.springframework.org/schema/cache/spring-cache.xsd">

  <cache:annotation-driven />
  <bean id="cacheManager"
        class="org.springframework.cache.concurrent.ConcurrentMapCacheManager" />
</beans>
@EnableCaching 和 <cache:annotation-driven /> 在底层是一样的工作机制,它们都是创建一层代理,
根据缓存注解的类型和状态来获取、更新或删除缓存。缓存管理器的作用是用于集成某个特定的缓存实现。
配置缓存管理器
Spring 3.1 自带了5个开箱即用的缓存管理器实现:
-
SimpleCacheManager
-
NoOpCacheManager
-
ConcurrentMapCacheManager
-
CompositeCacheManager
-
EhCacheCacheManager
Spring 3.2 新增一个用于兼容 JCache (JSR-107) 缓存的管理器,除了这些在Spring核心框架中的,Spring Data也提供了两个:
-
RedisCacheManager (Spring Data Redis项目)
-
GemfireCacheManager (Spring Data GemFire项目)
使用哪种缓存管理器取决于想使用的缓存实现,缓存管理器在使用时必须在Spring的上下文中声明为Bean。
下面代码展示如何配置 EhCacheCacheManager :
package org.calvin.springfast.cache;

import net.sf.ehcache.CacheManager;
import org.springframework.cache.annotation.EnableCaching;
import org.springframework.cache.ehcache.EhCacheCacheManager;
import org.springframework.cache.ehcache.EhCacheManagerFactoryBean;
import org.springframework.context.annotation.Bean;
import org.springframework.context.annotation.Configuration;
import org.springframework.core.io.ClassPathResource;

@Configuration
@EnableCaching
public class CachingConfig {
  @Bean
  public EhCacheCacheManager cacheManager(CacheManager cm) {         (1)
    return new EhCacheCacheManager(cm);
  }

  @Bean
  public EhCacheManagerFactoryBean ehcache() {                       (2)
    EhCacheManagerFactoryBean ehCacheFactoryBean = new EhCacheManagerFactoryBean();
    ehCacheFactoryBean.setConfigLocation(
      new ClassPathResource("org/calvin/springfast/cache/ehcache.xml"));
    return ehCacheFactoryBean;
  }
}| 1 | 注意Spring中的 EhCacheCacheManager ,在配置时需要用到Ehcache的 CacheManager 。 |
| 2 | EhCacheManagerFactoryBean 是个工厂Bean,用于生成Ehcache的 CacheManager 。 |
如果使用Redis,可以用Spring Data Redis项目中的 RedisCacheManager ,不过需要同时配置 RedisTemplate 和 RedisConnectionFactory 的实现类(比如 JedisConnectionFactory ):
package com.myapp;

import org.springframework.cache.CacheManager;
import org.springframework.cache.annotation.EnableCaching;
import org.springframework.context.annotation.Bean;
import org.springframework.data.redis.cache.RedisCacheManager;
import org.springframework.data.redis.connection.jedis.JedisConnectionFactory;
import org.springframework.data.redis.core.RedisTemplate;

@Configuration
@EnableCaching
public class CachingConfig {
  @Bean
  public CacheManager cacheManager(RedisTemplate redisTemplate) {
    return new RedisCacheManager(redisTemplate);
  }
  @Bean
  public JedisConnectionFactory redisConnectionFactory() {
    JedisConnectionFactory jedisConnectionFactory = new JedisConnectionFactory();
    jedisConnectionFactory.afterPropertiesSet();
    return jedisConnectionFactory;
  }
  @Bean
  public RedisTemplate<String, String> redisTemplate(RedisConnectionFactory redisCF) {
    RedisTemplate<String, String> redisTemplate = new RedisTemplate<String, String>();
    redisTemplate.setConnectionFactory(redisCF);
    redisTemplate.afterPropertiesSet();
    return redisTemplate;
  }
}
另外还可以使用 CompositeCacheManager 组合多个缓存管理器并从其中查询内容。
4.5.2. 为方法添加缓存注解
Spring提供了一些缓存注解:
| 注解 | 描述 |
|---|---|
@Cacheable |
告知Spring在调用方法前首先从缓存中查找内容作为该方法的返回值。在缓存里找到就返回, 否则就调用方法并将方法的返回值放入缓存中 |
@CachePut |
指示Spring将方法的返回值放入缓存。不会在方法调用前检查缓存是否存在该值,总是调用方法。 |
@CacheEvict |
指示Spring将某个或某些缓存内容释放 |
@Caching |
一个用于将其他的缓存注解作为一组来使用的注解 |
可以通过 @Cacheable 和 @CachePut 往缓存里添加值,两者的不同可以从上表中看出来,
但两个注解有些相同的属性:
| 属性 | 类型 | 描述 |
|---|---|---|
value |
String[] |
缓存使用的名字,注意不是key |
condition |
String |
SpEL表达式,如果为 false ,被注解的方法将不启用缓存功能 |
key |
String |
SpEL表达式,用于定制key |
unless |
String |
SpEL表达式,如果为 true ,方法的返回值将不被添加到缓存 |
比如可以这么使用 @Cacheable :
@Cacheable("spittleCache")
public Spittle findOne(long id) {                                    (1)
  try {
    return jdbcTemplate.queryForObject(
              SELECT_SPITTLE_BY_ID,
              new SpittleRowMapper(),
              id);
  } catch (EmptyResultDataAccessException e) {
    return null;
  }
}| 1 | 参数 id 的值将作为缓存内容的键值(key) |
如果将注解 @Cacheable 添加到接口的方法上,那么该接口的所有实现类都将继承该注解及其规则。
@Cacheable 和 @CachePut 有个 key 属性可通过使用SpEL表达式来自定义缓存key的生成。
Spring提供了许多SpEL的扩展:
| 表达式 | 描述 |
|---|---|
#root.args |
可获取到传给被缓存方法的参数,以数组的形式 |
#root.caches |
方法执行的缓存,以数组形式 |
#root.target |
目标对象 |
#root.targetClass |
目标对象的class,是 #root.target.class的简写 |
#root.method |
被缓存的方法 |
#root.methodName |
被缓存的方法的名称,#root.method.name的简写 |
#result |
被缓存的方法返回的值(该属性 |
#Argument |
该方法任何参数的名称或索引 |
比如可以将 key 定义为返回对象的id属性:
@CachePut(value="spittleCache", key="#result.id")                    (1)
Spittle save(Spittle spittle);| 1 | spittle对象的id是在保存后由数据库生成的,因此得使用 #result.id 来获取 |
在方法上添加缓存注解实际上会由Spring对该方法创建一个Around切面,因此可以有条件性地控制缓存的开启, 也就是使用之前图表中的 unless 和 condition 两个属性。
如果 unless 的 SpEL 表达式值为 true ,那么被注解方法的返回值将不被放入缓存,类似的, 如果 condition 的 SpEL 表达式值为 false ,那么将不在被注解的方法上启用缓存功能将。
|
这两个属性表面看来作用一样,但其实 unless 仅是阻止返回值被放入缓存, 但被注解的方法在调用时依然会去查询缓存,并在缓存中找到值后返回。 而 condition 是在 false 时不使用缓存。比如: 在返回的Spittle对象中如果其message属性包含 NoCache ,则该对象将不会放入缓存中。 |
@CacheEvict 用于缓存的移除(比如在数据被删掉时),与 Cacheable 和 CachePut 不同的是,
CacheEvict 可以用在返回 void 的方法上(毕竟 Cacheable 和 CachePut 需要将返回值放入缓存 )。
4.5.3. 在XML中配置
对于无法接触到源码的Bean,添加缓存注解是不可行的,这样就得借助在XML中配置的方式来解决。
在XML中配置需要用到 cache 命名空间,另外因为添加缓存必须使用切面,因此 aop 命名空间也要用到, 最基本的配置如下:
<?xml version="1.0" encoding="UTF-8"?>
<beans xmlns="http://www.springframework.org/schema/beans"
    xmlns:xsi="http://www.w3.org/2001/XMLSchema-instance"
    xmlns:cache="http://www.springframework.org/schema/cache"
    xmlns:aop="http://www.springframework.org/schema/aop"
    xsi:schemaLocation="http://www.springframework.org/schema/aop
    http://www.springframework.org/schema/aop/spring-aop.xsd
    http://www.springframework.org/schema/beans
    http://www.springframework.org/schema/beans/spring-beans.xsd
    http://www.springframework.org/schema/cache
    http://www.springframework.org/schema/cache/spring-cache.xsd">

    <!-- 这里放置缓存相关的配置 -->
</beans>
cache 命名空间中提供的一些可能会用到的配置元素如下表:
| 配置元素 | 描述 |
|---|---|
<cache:annotation-driven> |
启用注解驱动的缓存配置。等价于Java配置中的 |
<cache:advice> |
定义用于配置缓存的通知,配合 |
<cache:caching> |
在缓存通知中定义一些与缓存相关的规则 |
<cache:cacheable> |
指定某个方法可被缓存,等价于 |
<cache:cache-put> |
不多说了,等价于 |
<cache:cache-evict> |
等价于 |
举个例子示范一下用法:
<?xml version="1.0" encoding="UTF-8"?>
<beans xmlns="http://www.springframework.org/schema/beans"
    xmlns:xsi="http://www.w3.org/2001/XMLSchema-instance"
    xmlns:cache="http://www.springframework.org/schema/cache"
    xmlns:aop="http://www.springframework.org/schema/aop"
    xsi:schemaLocation="http://www.springframework.org/schema/aop
        http://www.springframework.org/schema/aop/spring-aop.xsd
        http://www.springframework.org/schema/beans
        http://www.springframework.org/schema/beans/spring-beans.xsd
        http://www.springframework.org/schema/cache
        http://www.springframework.org/schema/cache/spring-cache.xsd">

    <aop:config>
      <aop:advisor advice-ref="cacheAdvice"                                          (1)
        pointcut=
            "execution(* com.springfast.spittr.db.SpittleRepository.*(..))"/>
    </aop:config>

    <cache:advice id="cacheAdvice">
        <cache:caching>
          <cache:cacheable cache="spittleCache" method="findRecent" />               (2)
          <cache:cacheable cache="spittleCache" method="findOne" />
          <cache:cacheable cache="spittleCache" method="findBySpitterId" />

          <cache:cache-put   cache="spittleCache" method="save" key="#result.id" />  (2)
          <cache:cache-evict cache="spittleCache" method="remove" />
        </cache:caching>
    </cache:advice>

    <bean id="cacheManager"
          class="org.springframework.cache.concurrent.ConcurrentMapCacheManager" />
</beans>| 1 | 将缓存的通知绑定到该切面上 |
| 2 | <cache:cacheable> 与 <cache:cache-put> 等的 cache 属性值是重复的,
可以将其放到上层中,如 <cache:caching cache="spittleCache" >….</cache:caching> |
需要注意的是 <cache:advice> 有个 cache-manager 属性,默认值为 cacheManager ,
所以如果像上面代码那样可以不用设置,但如果缓存管理器的ID不等于默认值,则必须设置。
5. Spring Integration
5.2. 使用Spring MVC创建REST API
5.2.1. 创建第一个REST服务
使用之前的Spring Web技术就可以用于创建REST API,不过传统的 Spring Web 返回内容为 HTML 格式, 这不能满足大多数使用REST的场景(一般为JSON或XML),对返回内容的展现,Spring 提供了两个选择:
-
Content negotiation 内容协商,根据请求要求的返回内容格式选择视图
-
Message conversion 消息转换,对 Controller 返回的对象进行转换
基于内容的视图展现
Spring 提供的视图解析器 ContentNegotiatingViewResolver 用于根据客户端请求的媒体类型来选择视图。
@Bean
public ViewResolver cnViewResolver() {
    return new ContentNegotiatingViewResolver();
}
内容协商(content-negotiation)的第一步是弄清楚客户端所请求资源的展现格式。 ContentNegotiatingViewResolver 优先考虑 URL 中的文件扩展名,然后才是请求头中的 Accept ,比如 URL 结尾文件扩展名为 .json ,那么就被认为请求的媒体类型为 application/json 。
如果扩展名和 Accept 都未奏效, ContentNegotiatingViewResolver 将返回默认内容类型(content type) / 。
决定类型后 ContentNegotiatingViewResolver 将视图的解析交由其他视图解析器来完成,并将这些视图解析器返回的视图放入候选列表中,最后根据内容类型遍历该列表来匹配出可以满足的视图。
另外,媒体类型的选择过程可以通过定制 ContentNegotiationManager 来进行干涉:
-
设置默认的内容类型
-
指定通过某个请求参数来决定内容类型
-
忽略 Accept 请求头
-
将URL扩展映射为指定的媒体类型
ContentNegotiationManager 可以通过三种方式来配置:
-
直接声明一个类型为 ContentNegotiationManager 的Bean(不推荐)
-
间接使用 ContentNegotiationManagerFactoryBean 创建Bean(推荐在XML配置中使用)
-
重载
WebMvcConfigurerAdapter.configureContentNegotiation()方法(推荐在Java配置中使用)
XML中如下:
<bean id="contentNegotiationManager"
    class="org.springframework.http.ContentNegotiationManagerFactoryBean"
    p:defaultContentType="application/json">
Java中:
@Override
public void configureContentNegotiation(ContentNegotiationConfigurer configurer) {
    configurer.defaultContentType(MediaType.APPLICATION_JSON);
}
配置好 ContentNegotiationManager 之后需要将其注入到 ContentNegotiatingViewResolver 的属性中:
@Bean
public ViewResolver cnViewResolver(ContentNegotiationManager cnm) {
    ContentNegotiatingViewResolver cnvr = new ContentNegotiatingViewResolver();
    cnvr.setContentNegotiationManager(cnm);
    return cnvr;
}

// JSON视图
@Bean
public View spittles() {
    return new MappingJackson2JsonView();
}
ContentNegotiatingViewResolver 的好处在于不用修改 Controller 层代码,不足的是,作为视图解析器, 并不能决定 Controller 可以消费的内容类型(比如在客户端发送的数据为 JSON 或 XML 格式时)。
使用 HTTP 信息转换器
信息转换直接将 Controller 返回的数据转换为客户端请求的类型。 Spring 自带了许多信息转换器用于处理 “对象到展现(object-to-representation)” 类的需求。
| 信息转换器 | 描述 |
|---|---|
AtomFeedHttpMessageConverter |
将 ROME 框架中的 Feed 对象转为 Atom feeds(媒体类型为 |
BufferedImageHttpMessageConverter |
将图片的二进制数据转为 BufferedImage |
ByteArrayHttpMessageConverter |
读或写二进制数组。可读取任意媒体类型( |
FormHttpMessageConverter |
将内容以 |
Jaxb2RootElementHttpMessageConverter |
在xml和JAXB2注解的类之间转换。当在类路径中存在 Jaxb 2.x 时自动注册该转换器 |
MappingJackson2HttpMessageConverter |
在json和类或HashMap之间转换。当在类路径中存在 Jackson 2 JSON库时自动注册 |
RssChannelHttpMessageConverter |
在 RSS 源和 Rome 中的 Channel 对象直接转换。当类路径中存在 Rome 库时自动注册 |
如果客户端请求中的 Accept 头信息表示可以处理 application/json ,Jackson JSON 库在类路径中,
则 Controller 返回的对象将油 MappingJacksonHttpMessageConverter 转为 JSON 。
有些转换器由Spring自动注册,无需配置,但依然得保证依赖的库在应用的 ClassPath 中可以找到。
正常情况下 Controller 返回的对象会走 Model/View 处理流程,若要跳过转由信息转换器处理,
需要在 Controller 方法上添加 @ResponseBody :
@RequestMapping(method=RequestMethod.GET, produces="application/json")     (1)
public @ResponseBody List<Spittle> spittles(                               (2)
    @RequestParam(value="max", defaultValue=MAX_LONG_AS_STRING) long max,
    @RequestParam(value="count", defaultValue="20") int count) {
    return spittleRepository.findSpittles(max, count);
}| 1 | 使用 produces 属性声明该方法将只处理 Accept 为 application/json 的请求 |
| 2 | 使用 @ResponseBody 后返回的 List<Spittle> 将由 MappingJacksonHttpMessageConverter 或 MappingJackson2HttpMessageConverter (会使用哪个取决于类路径下Jackson库的版本)转为 JSON 后返回 |
Spring 中的信息转换器是可以双向转换的。正如可以用 @ResponseBody 应用转换器返回数据到客户端,
也可以使用 @RequestBody 来让 Spring 选择信息转换器来处理客户端发送来的数据。
@RequestMapping(method=RequestMethod.POST,consumes="application/json")
public @ResponseBody
    Spittle saveSpittle(@RequestBody Spittle spittle) {              (1)
    return spittleRepository.save(spittle);
}| 1 | 添加 @RequestBody 后 Spring 会根据请求中的 Content-Type 头信息来选择合适的转换器,
将请求数据转为 Spittle 对象 |
在每个方法上添加 @ResponseBody 或 @RequestBody 是件很繁琐的事, Spring 4.0 新增 @RestController 代替 @Controller 用于解决这个问题。添加该注解后 Spring 会在所有的处理方法中使用信息转换器。
5.2.2. 不止是提供资源
一个设计良好的 REST API 可不是只在客户端和服务端直接传输数据,同样也会提供一些与数据相关的元数据信息。
返回错误信息
目前为止,我们的代码在未找到数据的情况下依旧会向客户端返回 200(OK) 的状态码以及一个空的响应体,而显然返回 404(Not Found) 才是合适的。
Spring 提供了一些选择用于这类情况:
-
使用
@ResponseStatus指定返回的状态码 -
控制器方法可以返回 ResponseEntity 以返回更多的元数据信息
-
使用异常处理器专门处理这些错误的情况,而不用影响原来的控制器方法
除了 @ResponseBody ,控制器方法也可以返回 ResponseEntity 。
ResponseEntity 中包含返回的对象数据以及元数据(比如响应头和状态码),比如:
@RequestMapping(value="/{id}", method=RequestMethod.GET)
public ResponseEntity<Spittle> spittleById(@PathVariable long id) {
    Spittle spittle = spittleRepository.findOne(id);
    HttpStatus status = spittle != null ? HttpStatus.OK : HttpStatus.NOT_FOUND;
    return new ResponseEntity<Spittle>(spittle, status);
}
ResponseEntity 本身就相当于使用了 @ResponseBody ,所以其携带的数据也会自动被转换。
结合使用异常处理器和 @ResponseStatus 注解修改后如下:
@RequestMapping(value="/{id}", method=RequestMethod.GET)
public Spittle spittleById(@PathVariable long id) {
    Spittle spittle = spittleRepository.findOne(id);
    if (spittle == null) { throw new SpittleNotFoundException(id); }
    return spittle;
}

@ExceptionHandler(SpittleNotFoundException.class)
@ResponseStatus(HttpStatus.NOT_FOUND)
public @ResponseBody Error spittleNotFound(SpittleNotFoundException e) {
    long spittleId = e.getSpittleId();
    return new Error(4, "Spittle [" + spittleId + "] not found");
}
设置响应头信息
在 REST 中保存数据成功后应该返回 201 (Created) ,并在响应头的 Loaction 头信息里返回创建资源的地址。
状态码可以使用 @ResponseStatus 设置,而响应头信息则可以通过在 ResponseEntity 中设置 HttpHeaders :
@RequestMapping(method=RequestMethod.POST,consumes="application/json")
public ResponseEntity<Spittle> saveSpittle(
    @RequestBody Spittle spittle, UriComponentsBuilder ucb) {               (1)

    Spittle spittle = spittleRepository.save(spittle);
    HttpHeaders headers = new HttpHeaders();
    URI locationUri = ucb.path("/spittles/")
        .path(String.valueOf(spittle.getId()))
        .build()
        .toUri();

    headers.setLocation(locationUri);
    ResponseEntity<Spittle> responseEntity = new ResponseEntity<Spittle>(
        spittle, headers, HttpStatus.CREATED)
    return responseEntity;
}| 1 | UriComponentsBuilder 由 Spring 提供,用于构建 URL |